Issues: iPhone 6 Will Not Turn On Failure Repair
When your iPhone 6 doesn’t turn on with apple logo,the cell phone screen was replaced once after dropping.
According to our past repair experience, we know that the dropped device should be directly checked on its CPU parts. First of all, check the bus and reset, both of them are normal. Cut the shiled cover above the fingerprint, use Fluke 15B+ digital multimeter to measure the resistance of CPU to the clock and data.
The normal values of R0317 and R0316 are more than 400, the measurement of R0317 resistance is 745, and the R0316 is 479. This case is mostly the two pin of AP31 and AR31 in the right lower right corner of CPU has pseudo soldering. First press the iPhone 6 CPU to test whether the device can turn on or not, do not try to reflash the phone first, it will report error 9. Of course, the best method for CPU pseudo soldering is redo the parts, here we try a method of jumper wire connection without removing CPU necessary (6 and 6P can be common used).
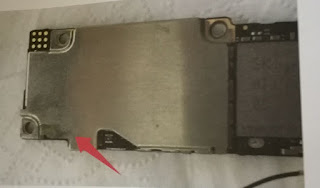
As shown in picture 17-1-1, look at the position of the two points on the wuxinji schematic diagram, the lower right corner is 0, the width is 1.45MM (the width of 4 solder joints), the height is 1.75MM (the height of the 7 solder joints), which can be slightly shaved on this basis, first probably draw a rectangle. When the upper cover is very hard, do not use brute force, select a sharp phone repair blade, you should slow down when finish scraping on the white pad from cover to the CPU upper cover, after scraping the white pad, the point we are looking for will come out, the wire on the CPU chip must be operated under the HDMI Camera microscope.
picture 17-1-1

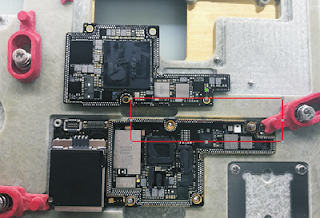
First test the resistance of the two points. If normal, smear green oil on the top (except for the two points we are going to connect jumper wire). After the curing we can connect jumper wire, use QUICK TR1300A hot air gun(TR1300) to blow very small tin balls on the 2 points respectively , we choose to use the wire of the receiver, it's thinner, the receiver wire is with glue, scrape the 2 ends and apply a little solder. As shown in picture 17-1-2.
Picture 17-1-2

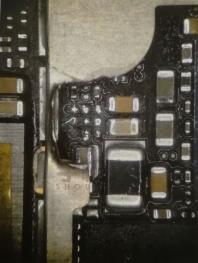
Use jumper wire on the corresponding two points separately. ( it's better to do on both two points to avoid rework repair). Once you finish flying, just apply the green oil and use UV light for curing.
According to our past repair experience, we know that the dropped device should be directly checked on its CPU parts. First of all, check the bus and reset, both of them are normal. Cut the shiled cover above the fingerprint, use Fluke 15B+ digital multimeter to measure the resistance of CPU to the clock and data.
The normal values of R0317 and R0316 are more than 400, the measurement of R0317 resistance is 745, and the R0316 is 479. This case is mostly the two pin of AP31 and AR31 in the right lower right corner of CPU has pseudo soldering. First press the iPhone 6 CPU to test whether the device can turn on or not, do not try to reflash the phone first, it will report error 9. Of course, the best method for CPU pseudo soldering is redo the parts, here we try a method of jumper wire connection without removing CPU necessary (6 and 6P can be common used).
As shown in picture 17-1-1, look at the position of the two points on the wuxinji schematic diagram, the lower right corner is 0, the width is 1.45MM (the width of 4 solder joints), the height is 1.75MM (the height of the 7 solder joints), which can be slightly shaved on this basis, first probably draw a rectangle. When the upper cover is very hard, do not use brute force, select a sharp phone repair blade, you should slow down when finish scraping on the white pad from cover to the CPU upper cover, after scraping the white pad, the point we are looking for will come out, the wire on the CPU chip must be operated under the HDMI Camera microscope.
picture 17-1-1
First test the resistance of the two points. If normal, smear green oil on the top (except for the two points we are going to connect jumper wire). After the curing we can connect jumper wire, use QUICK TR1300A hot air gun(TR1300) to blow very small tin balls on the 2 points respectively , we choose to use the wire of the receiver, it's thinner, the receiver wire is with glue, scrape the 2 ends and apply a little solder. As shown in picture 17-1-2.
Picture 17-1-2
Use jumper wire on the corresponding two points separately. ( it's better to do on both two points to avoid rework repair). Once you finish flying, just apply the green oil and use UV light for curing.
Comments
Post a Comment