Iphone 6 Brush Machine error 56 How to repair
Mobile phone repair peer sent to a iPhone6 mobile phone, said that is the customer upgrade, the appearance of brush machine Error 56, this situation how we should solve it, Vippro shop team tell you how to do?
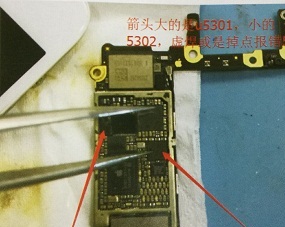
Generally, flash iPhone and then display error 56 is caused by a rear camera inductor, a capacitor short-circuit or camera power supply. Furthermore, it is caused by dropping pins, virtual welding or disconnecting on NFC chip U5301/U5302. As shown in picture 8-1-1.
After remove the chip, we found it clearly dropped pins. As shown in picture 8-1-2.
Combining bitmap observations, we found that most of them are empty points; There is a place need to solder. Check the motherboard, no disconnection found on it. So, we just need use rework station to solder F7 pin. As shown in picture 8-1-3.
After finish soldering jump wire with rework station, flash it to "hello" interface. We thought the repairs were over. However, when we get the ID to enter the IOS, and test function, we found the front/rear camera is not working. As we said before, the camera issue also will cause the iTunes reports error 56. But why after fixing NFC, the iPhone can flash normally? Vip Pro Shop Team said did not install the camera and then flash device into the IOS, the camera cannot be used. After flashing the iPhone again and into the IOS, it still can't take pictures, and then we measure the resistance of the interface.
8-1-4
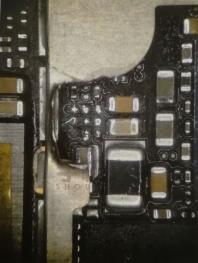
The resistance value all is normal, the diode data of 2.85V camera power supply is normal, and there is no disconnection on FL2343. Power on device and test it, there is no camera power supply. 2.85V principle is simple, no output, and remove the pipe under the microscope. As shown in picture 8-1-5 and 8-1-6.
The diode data of open pin is infinitely large, and the CPU is disconnected. In this case, we can borrow power from fingerprint 3V. After soldering jump wire, boot iPhone and test it, still can't take pictures. It suddenly occurred to me that the iPhone fingerprints could not be used, it's Home Button has been replaced, so there is no 3V, and then we can make the jump wire on NAND 3V power supply. As shown in picture 8-1-7 and 8-1-8, from C0604 to U2301 A2 pin.
Now we assemble the iPhone, power on it and then test it, the front and rear camera all back to normal, the repair is over here!


Comments
Post a Comment