How to Check Mic of A Cell Phone
Introduction
In cell phones, during a call, when you speak, your voice goes into the mic. A mic converts voice into electrical signal. It is also called microphone and mouthpiece. It will always be at the bottom, inside a cell phone. If it becomes faulty, the person you are talking to will not hear your voice. You can try using an earphone (headset) and try if your voice is being transmitted! The method to check it will be the same for any brand or model of a mobile phone or a tablet be it an iPhone, a Samsung Galaxy.... You can check it with either a digital or an analog multimeter, but most technicains today prefer digital multimeters as analog ones are outdated.
This guide will offer you the detailed instructions on how to check mic of a cell phone. Follow the step-by-step repair instructions,We’ll get your iPhone looking brand new again in no time! All the DIY repair parts and tools used in this guide can be found here.
Recommended Tools:
Opening Tool Kit
Screen Sucker
Multimeter
High Hardness Screwdriver
Tommy Bar Opening Pry Tool
Opening Pry Tool Stainless Steel Triangular
Steps:
1.Turn off your cell phone and tear it down carefully.
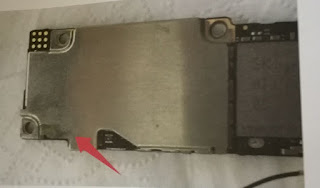
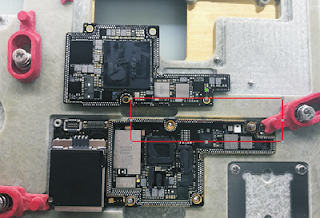
2.Now remove the mic which is located at the bottom. There is a small hole at the bottom of the casing (body panel) for the voice to enter the mic. The mic will always be exactly below it inside the casing.
3.Now keep the multimeter on resistance setting. It may be indicated by the symbol ‘Ώ’. In resistance too, there are many settings. Keep it on 20K or 20KΏ setting.
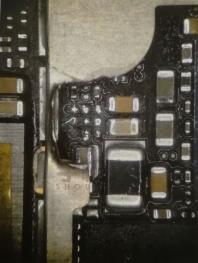
4.Now touch the tip of the 2 red and black probes of the multimeter to the 2 terminals (pins) of the mic. Now blow air with your mouth into its hole. If the reading on the screen increases rapidly, your mic is good and working. In most mics, the reading rapidly increases to around 100. And if the reading is still 1 after blowing air, your microphone is faulty.
In cell phones, during a call, when you speak, your voice goes into the mic. A mic converts voice into electrical signal. It is also called microphone and mouthpiece. It will always be at the bottom, inside a cell phone. If it becomes faulty, the person you are talking to will not hear your voice. You can try using an earphone (headset) and try if your voice is being transmitted! The method to check it will be the same for any brand or model of a mobile phone or a tablet be it an iPhone, a Samsung Galaxy.... You can check it with either a digital or an analog multimeter, but most technicains today prefer digital multimeters as analog ones are outdated.
This guide will offer you the detailed instructions on how to check mic of a cell phone. Follow the step-by-step repair instructions,We’ll get your iPhone looking brand new again in no time! All the DIY repair parts and tools used in this guide can be found here.
Recommended Tools:
Opening Tool Kit
Screen Sucker
Multimeter
High Hardness Screwdriver
Tommy Bar Opening Pry Tool
Opening Pry Tool Stainless Steel Triangular
Steps:
1.Turn off your cell phone and tear it down carefully.
2.Now remove the mic which is located at the bottom. There is a small hole at the bottom of the casing (body panel) for the voice to enter the mic. The mic will always be exactly below it inside the casing.
3.Now keep the multimeter on resistance setting. It may be indicated by the symbol ‘Ώ’. In resistance too, there are many settings. Keep it on 20K or 20KΏ setting.
4.Now touch the tip of the 2 red and black probes of the multimeter to the 2 terminals (pins) of the mic. Now blow air with your mouth into its hole. If the reading on the screen increases rapidly, your mic is good and working. In most mics, the reading rapidly increases to around 100. And if the reading is still 1 after blowing air, your microphone is faulty.
Comments
Post a Comment