Posts

Slove iPhone X Won't Turn On

Image
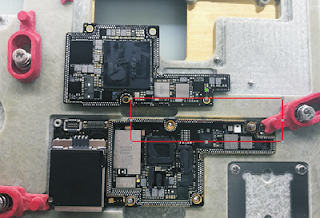
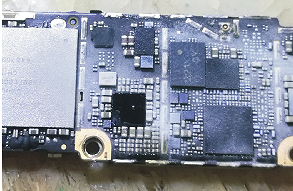
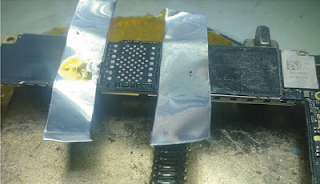
Customer delivered a iPhone X and described the fault is not to boot after the phone drop accidentally. It reports error 56 when restore the iPhone X. How to repair this fault? Because iPhone X is the two board connected through the middle column, it is easy to drop the point. It may be that the solder points from NFC chip to the CPU part have fell off. Take apart the iPhone X by iPhone Screwdriver Repair Tools , take the upper board off the main board, when separate the main board we see a row of points have fell off. Picture 19-3-1 Look at the location map on WUXINJI dongle , it is surrounded by a ground wire, in fact, there are 6 useful points dropped. The ground wire does not need to be filled, the 6 useful points are added by professional phone welding tools. These are the signal wires of the NFC chip, so the iPhone X would report error 56. Picture 19-3-2 Then the tin of the middle column is repaired by iPhone X BGA reballing stencil , and the AP part is welded bac

IPhone 6P Front Camera and Distance Sensor Fault

Image
Received a iPhone 6 Plus, the customer said that the front camera can not be used, and the distance sensor has problem too. The two failures are concentrated on the front camera flex cable, which is likely to be caused by the damage of the wiring. First, we have to eliminate the possibility of the external parts fault, then consider the motherboard problem. Remove the screen assembly and replace it with a good one, we still can't turn on the front camera and use the distance sensor. Disassemble to measure the ground resistance of the front camera seat of J1111 by Fluke digital multimeter , it is found that several pins are infinitely large, and the related inductors are loose when touch with the pen. It seems that the small components are pseudo welded. 19-1- 1 Remove the motherboard and observe it under the Trinocular Stereo Microscope , we can see that the touch was repaired before. 19-1-2 The back of the sub touch chip U2402 is the front camera seat J1111, an

Repair iPhone 6 won't turn on issue

Image
Yesterday, a friend sent us an iPhone 6 need to be repaired, the iPhone 6 directly short-circuit after connected it to DC power supply, large current short circuit and iPhone motherboard is overheating. We think it's small problem, disassemble the iPhone, and we found the iPhone charge tube is hot. Remove the shield cover  and apply some rosin, obviously the iPhone baseband power is damaged. Remove the iPhone baseband power and then connect iPhone logic to DC power supply, the iPhone boot, but no display, check it more clearly, several pins on the socket are damaged. Picture 19-7-1 Remove the socket, clean up the solder pad, and then re-solder the good socket to it. After replacement, the iPhone can be turned on normally, but there is no baseband. Install the new iPhone baseband power, but there's no SIM card malfunction, continue to measure it, also no front and rear camera. The iPhone 6 no front and rear camera is usually caused by 2.85V power supply problem, directly

Solution speaker and handset no sound failure repair

Image
Here I will explain about different reasons of why there is no sound in mobile phone and how to fix this problem. Redmi speaker has no sound when playing the music, and the handset also has no sound when make the phone calls. We need to repair it. First check whether the Redmi is in headphones mode, after checking, the Redmi doesn't in headphones mode, but the speaker and handset still not working. Disassemble the Xiaomi Redmi by phone opening tools, use digital multimeter  to measure the EAR_DET voltage, after measurement, there is no voltage and it is short circuit, R1904 is short circuit. Take out the R1904 by Precision Titanium Alloy Tweezers , we find the capacitor DCD_HS_DET is short circuit. Picture 18-12-1 Check Redmi schematic diagram, we know that CDC_HS_DET leads to a Redmi power supply IC. Test the Redmi, we find the power supply IC is overheat, replace the new Redmi power supply IC . Now find a 2.2K (222 capacitor), and then replace the R1904 capacito

iphone7 screen does not display

Image
Received a iPhone7 from one of our customers. The fault described is that it can enter the system and the customer can hear the message voice, but the iPhone screen does not show anything but black. As shown in picture 1. Pic 1 Connect the adjustable DC power supply , the current shows all normal, and it also respond when connect it to the computer. Disassemble the iPhone 7 motherboard to measure the basic conditions of the display function by Fluke digital multimeter , it's measured that the seventh pin PP_1V8 of  touch socket(J4502) display power supply at infinite value, now the fault is found. Pic 2 The power supply is changed from PP_1V8 to PP1V8_LCM_CONN by inductor FL3906 conversion. The end of the inductor has resistance value, and the other end has no value, so we judge it's FL3906 damage. Connect the jumper wire  as shown in picture 3. Pic 3 Failure is repaired successfully!

Solution iPhone 6s Stuck on White Apple Logo Fault Repair

Image
Customer received an apple 6S, the phone stuck on white apple logo when turning it on, sometimes black screen. Try to enter iTunes mode online, we are not able to enter iTunes data cable mode but DFU mode,which can be online, and we can confirm that it has nothing to do with U2 fault. There is automatic black screen after the white apple appears. The computer prompt can not jump from DFU to recovery mode. This is often caused by iPhone NAND or CPU. The power supply of the iPhone 6s can be measured according to the WUXINJI schematic diagram . The two 1.8V are on C1534 and C1560 respectively, 0.9V is on C1548, and 3.0V is on C1502, and the NAND voltage is normal. You need to take down the pin resistance of the NAND to see if there is a break between the CPU and the NAND chip. At the same time, you need to test whether the NAND itself is damaged. The protective measures should be pre heated to remove glue, and the temperature is about 220 degrees. Choose the thinnest blade, excep

iPhone 7 WiFi function failure

Image
Received a iPhone 7 with WiFi function failure, the customer is very anxious and unwilling to wait, so how to repair it in a short time? iPhone  6, 6S WIFI fault repair case is common, the NAND chip is universal, so the repair process should be similar. At beginning, the WiFi was unsuitable, so we directly replac e  a good one, and start to detect WiFi's MAC address. After installing the WiFi and reboot to test the address, we found there is no any problems. Then the next step is to remove the   iPhone 7 NAND chip . As shown in picture 1. picture 1 After that, put the NAND chip on WL PCIE programmer   to unbound WiFi. As shown in picture 2. picture 2 WiFi unbound is successful after installing to test, but the WiFi can not be turned on. Where is the problem? It's the same situation after reflashing the iPhone. In the past, 6S WiFi unbound was sometimes unsuccessful, so we remove it and unbound again, it is OK this time . WiFi is normal